


- 电脑软件问题咨询
邮 箱:afengsoft@163.com
- 软件售前咨询
邮 箱:support@zrsite.com
电 话:13760190104
- 商务合作咨询
Q Q:41850604/6182884
鄙文主要讨论如何在asio上扩展自定义的异步io操作。包括asio中经典的Context/Service插件机制,以及我们将经常打交道的几个Service,还有使用asio调度器的一些注意事项等。
1. Context/Service机制
在使用asio开发时,我们都会创建两类对象:一类是exection context,另一类是IO object. 比如我们以asio的tcp socket为例:
asio::io_context ioc{};asio::ip::tcp::socket socket{ ioc };
asio::io_context是execution context的实现类,而asio::ip::tcp::socket则是IO object. 以上短短的两行代码,用户就已经通过IO object对象,将tcp/ip的socket功能装载入io_context中。也就是将socket service,注册到了io_context中。注册的扳机是asio::detail::io_object_impl模板类。
1.1 io_object_impl
asio::ip::tcp::socket类型,抛开中间的各种实例化和继承的关系,它本质上是asio::detail::io_object_impl实例化类型的外观。如下面代码所示(代码经过简化处理,方便展示概念,与asio有出入)
// in namemspace asioclass socket{private:detail::io_object_impl<detail::reactive_socket_service<ip::tcp>,io_context::executor> impl_;public:socket(const io_context::executor& ex): impl_(0, ex){}};
可以看到socket外观类,使用了reactive_socket_service(这里以linux平台为例),和io_context导出的executor,对io_object_impl进行实例化;而socket构造函数,将io_context关联的executor传递给impl_成员。我们再来看看io_object_impl对应的构造函数:
// in namespace asio::detailtemplate <typename IoObjectService,typename Executor = io_context::executor_type>class io_object_impl{public:// The type of the service that will be used to provide I/O operations.typedef IoObjectService service_type;// The underlying implementation type of I/O object.typedef typename service_type::implementation_type implementation_type;// The type of the executor associated with the object.typedef Executor executor_type;// Construct an I/O object using an executor.explicit io_object_impl(int, const executor_type& ex): service_(&asio::use_service<IoObjectService>(io_object_impl::get_context(ex))),executor_(ex){service_->construct(implementation_);}private:// The service associated with the I/O object.service_type* service_;// The underlying implementation of the I/O object.implementation_type implementation_;// The associated executor.executor_type executor_;};
构造函数非常明确的展示了io_object_impl通过Executor获取Execution Context对象,并通过use_service函数向Execution Context中注册Service. 对implementation_type相关的内容,我们暂时跳过。这里着重关注use_service函数,它是asio向其异步IO事件框架中,装载具体IO功能(这里是reactor_socket_service)的关键入口。
1.2 Context/Service的对象模型
Context/Service大家也许很陌生,但换一个说法也许大家就很熟悉了。例如COM中使用的Component/Interface组件对象模型,还有游戏引擎中常用的Object/Component模型。如下图所示:
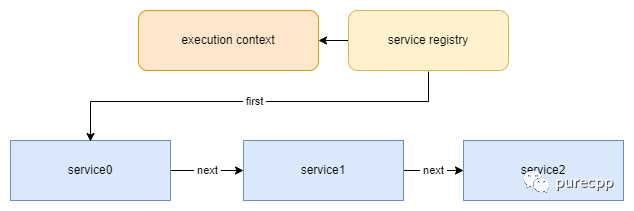
use_service函数实际上就是向Execution Context中管理Service集合的类Service Registry中申请一个指定的Service对象。而service_registry则会保证每一种Service只有一个,没有的时候创建一个新的为原则,最终将有效的Service引用返回。当然,以上操作都是线程安全的。值得一提的是,Service Registry使用了一个id来区分不同的Service,而id的生成则是通过CRTP配合std::type_info来生成的,如下代码所示:
// Special derived service id type to keep classes header-file only.template <typename Type>class service_id: public execution_context::id{};// Special service base class to keep classes header-file only.template <typename Type>class execution_context_service_base: public execution_context::service{public:static service_id<Type> id;// Constructor.execution_context_service_base(execution_context& e): execution_context::service(e){}};// implement your private servicetemplate <typename PortSpace>class rdma_core_service :public execution_context_service_base<rdma_core_service<PortSpace>>{// ....};
需要注意的是CRTP中的传递的实现类千万不要写错了,这里是rdma_core_service<PortSpace>. 否则底层计算的ID会出错。如果ID是某一个已经存在的Service的ID,会直接将那个Service返回给用户,这将会是非常危险的事情。虽然CRTP可以在正确的情况下用户保证在运行时保证类型安全,但是错误的使用并不会有任何编译期报错,并将灾难抛给运行时。
2. 如何扩展一个有效的Service
到现在为止,我们应该知道扩展asio的关键是实现自己的Service,并实现自己的io_object_impl外观类。Service负责实现具体的同步或者异步IO的操作,而外观类则提供封装好的接口,让用户方便地,正确地使用Service提供的能力。下面,我么展开讨论一下:
2.1 导出implement_type
回顾一下第一节贴出的io_object_impl代码段,其中有一个implementation_的成员。它的类型是io_object_impl通过Service中导出的implementation_type而来。它是IO Object真正的数据实现,并由各个Service来定义。这样做的好处是,可以让每个平台来处理自己的实现细节。比如Linux平台的reactor_socket_service使用的socket类型是fd,而windows平台的iocp_socket_service则使用的是SOCKET,implementation_type的使用,可以让io_object_impl不用关心平台相关的数据类型差异和实现细节。
例如本系列文档讨论的在asio上封装rdma-core(https://github.com/linux-rdma/rdma-core)功能的Service
template <typename PortSpace>class rdma_core_service :public execution_context_service_base<rdma_core_service<PortSpace>>{public:// The implementation type of the cm id.struct implementation_type{// The native cm representation.rdma_cm_id_data* cm_id_data_;// state for memory regionrdma_mr_state mr_state_;// if there is a queue pair attached to this io objectbool has_qp_;};};
2.2 实现The Rule of Five
io_object_impl会实现自己的The Rule of Five(https://en.cppreference.com/w/cpp/language/rule_of_three). 例如第一节io_object_impl中的构造函数,转发给了Service的construct函数。这样的函数照例,我们需要实现如下:
template <typename PortSpace>class rdma_core_service :public execution_context_service_base<rdma_core_service<PortSpace>>{public:// Construct a new implementation.inline void construct(implementation_type& impl);// Destroy a implementationinline void destroy(implementation_type& impl);// move constructorinline void move_construct(implementation_type& impl, implementation_type& other_impl);// move assigninline void move_assign(implementation_type& impl,rdma_core_service& other_service, implementation_type& other_impl);};
io_object_impl是Noncopyable,所以只用实现Move Constructor和Move Assignment Operator. 至于Converter Constructor,则根据用户自己的需求来决定。
2.3 Overwrite一些必要的函数
Service中还有几个需要Overwrite的函数,如下列代码所示:
template <typename PortSpace>class rdma_core_service :public execution_context_service_base<rdma_core_service<PortSpace>>{public:/// Destructor.ASIO_DECL virtual ~rdma_core_service()/// Destroy all user-defined handler objects owned by the service.ASIO_DECL virtual void shutdown();/// Handle notification of a fork-related event to perform any necessary/// housekeeping./*** This function is not a pure virtual so that services only have to* implement it if necessary. The default implementation does nothing.*/ASIO_DECL virtual void notify_fork(execution_context::fork_event event);};
Virtual Destructor就不多说了, 因为Service Registry持有的是基类指针,清理Service的时候析构函数得是Virtual. Shutdown则是给有状态的Service在整个asio发起Shutdown的时候清理和校验自己扩展点。notify_fork只适用于Linux平台,用来响应Fork系统调用的事件。
2.4 实现IO Object外观类
如第一节代码所示,用户并不直接调用Service的接口来适用asio的功能,而是通过IO Object. 因此,我们还要实现对应的IO Object外观类。以普遍理性而论,Service与IO Object外观是一对多的关系,例如在linux平台上Socket和Socket Acceptor都是对应于reactive_socket_service. 反过来,因为IO Object会使用一个确定的Service导出的implementation_type,IO object只能对应一个确定的Service. 例如一个rdma_connetion的实现:
// IO object for rdma, provides rdma functionalitytemplate <typename PortSpace, typename Executor = any_io_executor>class rdma_connection{public:// ....#if ASIO_HAS_IOCPusing service_type = detail::rdma_iocp_connector_service<PortSpace>;#elseusing service_type = detail::rdma_core_service<PortSpace>;#endifprivate:detail::io_object_impl<service_type> impl_;public: // implement interfacevoid open(port_space_type const& port_space);bool is_open() const{return impl_.get_service().is_open(impl_.get_implementation());}// .....};
通过外观类调用Service的接口,可以参考is_open成员方法的实现。这里为了方便说明,简单起见只用了一个同步的,实现简单的接口作为展示。
至此,我们就可以在asio上扩展我们的“插件”了。可以发现我们并没有侵入式的修改asio的任何代码,这都得益于Context/Service对象模型强大的可扩展性。
3. 如何扩展异步操作
asio是异步IO框架,如果我们需要支持自定义的异步IO操作,还需要做一些额外的事工作。在工作开始之前,我们需要了解一些asio底层调度器的细节。
3.1 asio中的Scheduler
asio的实现中没有一个具体的统一的Scheduler实现,原因是Linux平台上使用了Reactor模式,而Windows平台则是基于IOCP的Proactor模式。两个模式有差异,但asio的选择是在Linux平台上实现一个scheduler类,并与Reactor一同工作,提供与Proactor模式相同的接口。最后,asio对Service层提供了一套统一的Scheduler机制,如下图:
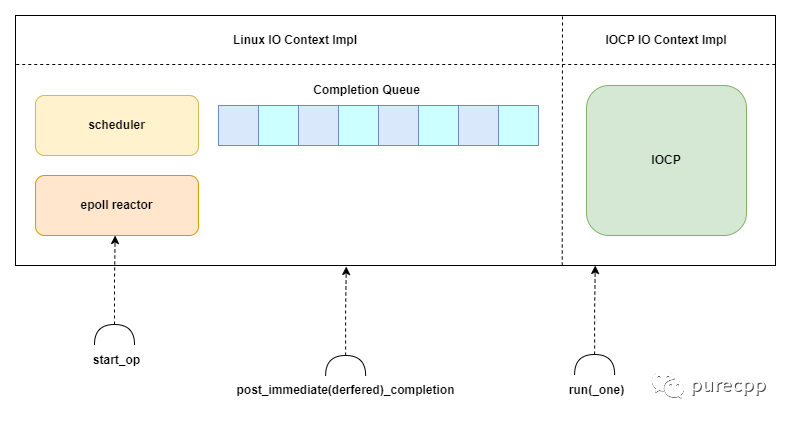
由上图我们可以看到,Reactor中额外实现了一个scheduler类,它内部管理了一个Completion Queue,来模拟与IOCP中等同的功能,并允许用户直接向该队列Post一个回调。
统一的Scheduler机制,也就是各个平台实现的context_impl类,并不能抹平Reactor与Proactor所有的差异。对于Proactor而言,IO函数的调用就直接发起了异步IO操作(Windows平台中WSA系列的函数)。而Reactor依旧是同步IO,因此Reactor额外提供了start_op接口。该接口将根据IO的类型,将IO事件注册给Reactor,并同步地在Scheduler收到IO事件后,选择适当的时机执行IO操作。
调度的过程和细节,asio封装的Reactor与Proactor也有所不同。基于IOCP的Completion Queue中,只有IO完成事件回调和用户主动Post入队的回调;而基于Reactor的Completion Queue中,除了这两个回调以外,还有从Reactor中通知的同步IO事件。
对asio中Reactor与Proactor的机制有所了解之后,我们便可以继续在不同平台上适配异步操作的工作了。
3.2 扩展Reactor模式的异步操作
首先是Reactor模式下的异步操作封装。我们知道,在Reactor模式下,asio有同步调用IO函数的机制。对asio源码稍作阅读后,不难发现这些秘密都藏在asio::detail::reactor_op类中。我么只要继承该类,并覆盖两个关键的函数,一个是同步执行IO操作的函数,另一个是IO完成的函数,就能够实现自定义的异步操作。当然,在Reactor模式下的异步操作,是模拟的异步操作。
// reactor_op implemetionclass reactor_op : public operation{ /******/ };class your_reactor_async_op : public reactor_op{public:your_reactor_async_op(asio::error_code const& success_ec, ...): reactor_op(success_ec, do_perform, do_complete)//, other initialization{}static status do_perform(reactor_op* base){auto* this_op = static_cast<your_reactor_async_op*>(base);// TODO ... call your sync io}static void do_complete(void* owner, operation* base,const asio::error_code& /*ec*/,std::size_t /*bytes_transferred*/){auto* this_op = static_cast<your_reactor_async_op*>(base);// TODO ... do your io completion logic}};
reactor_op类是继承自operation类,该类也是Scheduler中Completion Queue链表的节点类,因此我们可以把要模拟的某个异步IO操作的perform和complete业务都实现在一起。
3.3 扩展IOCP Proactor模式的异步操作
扩展IOCP Proactor的操作就比Reactor模式下简单许多。operation类继承自OVERLAPPED结构体,可以直接把op操作传递给异步IO函数的LPOVERLAPPED指针参数。因此我们只需要考虑IO complete回调即可。
class your_iocp_async_op : public operation{public:your_iocp_async_op(...): operation(do_complete)//, other initialization{}static void do_complete(void* owner, operation* base,const asio::error_code& /*ec*/,std::size_t /*bytes_transferred*/){auto* this_op = static_cast<your_iocp_async_op*>(base);// TODO ... do your io completion logic}};
3.4 独立于Scheduler之外的Completion Queue
有些IO库或者标准中的IO完成事件,并不能统一到asio的标准统一Scheduler中。例如rdma中的Completion Queue(CQ). 这种设计也是合理的,毕竟使用统一的调度,并不能满足对低延迟极度敏感的场景。
适配类似rdma中的CQ,一个简单可行的做法,可以参考在asio上尝试RDMA中第二节的内容。除此之外,既然rdma提供了CQ的概念和Poll CQ的接口,说明用户一定存在自己主动使用它们的场景。于是笔者尝试提供了CQ对象,让用户可以在任意线程主动Poll CQ.
asio::io_context ioc{};asio::rdma::completion_queue cq{ ioc };std::thread thread {[&] { cq.run(); }}
该场景下,io_context中的统一调度CQ的Service将会停止工作,并把Poll CQ的权限交给用户。
3.5 io_object_impl通过initializer转发给Service
有了适配各个平台的异步操作定义之后,剩下的工作就是为io_object_impl与Service实现异步接口了。io_object_impl外观类的实现尽量统一,但是每个平台的Operation类型实现大概率不一样,asio在外观类层通过Initializer的机制,把实现上的差异转发给了各个平台的Service,我们以rdma_connect的一个实现为例:
// IO object for rdma, provides rdma functionalitytemplate <typename PortSpace, typename Executor = any_io_executor>class rdma_connection{public:// .......class initiate_async_connect;// async connecttemplate <ASIO_COMPLETION_TOKEN_FOR(void (asio::error_code))ConnectToken ASIO_DEFAULT_COMPLETION_TOKEN_TYPE(executor_type)>ASIO_INITFN_AUTO_RESULT_TYPE_PREFIX(ConnectToken,void (asio::error_code))async_connect(endpoint_type const& endpoint,ASIO_MOVE_ARG(ConnectToken) tokenASIO_DEFAULT_COMPLETION_TOKEN(executor_type))ASIO_INITFN_AUTO_RESULT_TYPE_SUFFIX((async_initiate<ConnectToken, void (asio::error_code)>(declval<initiate_async_resolve_route>(), token,declval<asio::error_code&>()))){asio::error_code open_ec{};if(!is_open()){open_ec = asio::error::try_again;}#if ASIO_HAS_IOCPif(!open_ec){impl_.get_service().allocate_qp(impl_.get_implementation(), open_ec);}#endifreturn async_initiate<ConnectToken, void(asio::error_code)>(initiate_async_connect(this), token, endpoint, open_ec);}// initializer for async_connect_opclass initiate_async_connect{public:using executor_type = Executor;explicit initiate_async_connect(rdma_connection* self) ASIO_NOEXCEPT: self_(self) {}template <typename Handler>void operator() (ASIO_MOVE_ARG(Handler) handler,endpoint_type const& endpoint,asio::error_code const& open_ec) const{ASIO_CONNECT_HANDLER_CHECK(Handler, handler) type_check;if(open_ec){asio::post(self_->impl_.get_executor(),asio::detail::bind_handler(ASIO_MOVE_CAST(Handler)(handler), open_ec));}else{detail::non_const_lvalue<Handler> handler2(handler);self_->impl_.get_service().async_connect(self_->impl_.get_implementation(), endpoint,handler2.value, self_->impl_.get_executor());}}private:rdma_connection* self_;};};
Initializer还担任了很多编译期检查的工作,比如Handler的类型是否满足,Buffer是否满足ConstBufferSequence的约束等。在跟祁宇的一次讨论中,他还提到了Initializer的设计还可以让用户去特化async_result来实现自定义异步操作,是一个很强大的用户扩展点。
3.6 Service通过Scheduler发起IO操作
io_object_impl通过Initializer转发给Service之后,剩下的事情就很简单了。Service的异步操作接口主要负责创建对应的异步操作对象,初始化操作对象,并通知Scheduler发起IO操作。
以rdma在Linux和Windows平台上的实现为例:
// rdma-core for linuxtemplate <typename PortSpace>template <typename Handler, typename IoExecutor>void rdma_core_service<PortSpace>::async_connect(implementation_type& impl,endpoint_type const& endpoint,Handler& handler, const IoExecutor& io_ex){bool const is_continuation =asio_handler_cont_helpers::is_continuation(handler);// TODO ... cancellationusing op = rdma_cm_connect_op<PortSpace, Handler, IoExecutor>;typename op::ptr p = { asio::detail::addressof(handler),op::ptr::allocate(handler), 0 };p.p = new (p.v) op(success_ec_, implNaN_id_data_->cm_id_, get_context(), handler, io_ex);cm_event_service_.start_connect_op(implNaN_id_data_, p.p, endpoint.data(), is_continuation);p.v = p.p = 0;}// iocp for windowstemplate <typename PortSpace>template <typename Handler, typename IoExecutor>void rdma_iocp_connector_service<PortSpace>::async_connect(implementation_type& impl, endpoint_type const& endpoint,Handler& handler, const IoExecutor& io_ex){// TODO ... cancellationusing op = rdma_nd_connect_op<Handler, IoExecutor>;typename op::ptr p = { asio::detail::addressof(handler),op::ptr::allocate(handler), 0 };p.p = new (p.v) op(impl.connector_.Get(), handler, io_ex);start_connect_op(impl, endpoint, p.p);p.v = p.p = 0;}
需要注意的是,Reactor与Proactor模式的差异在这里就显现出来了。Reactor在这里发起的是一个reactor_op操作, 注册给Connection Mananger也就是这里的cm_event_service_对象,真正的connect函数调用是在Connection Mananger的事件Channel对应的fd有POLLIN消息的时候,才会调用。而对于IOCP Proactor而言,start_connect_op会直接非阻塞地调用Connector的Connect函数,并在Connection创建成功后,通过IOCP的Completion Queue通知用户。
4. 小结
本文简要地讨论了如何在asio中扩展自己的异步IO操作,简单分析了Context/Service对象模型,简述如何实现自己的IO Object外观类以及对应的Service类。最后讨论了如何在Reactor和Proactor上扩展自定义的异步操作。